
Groups and Groupings: Organising students using groups and groupings

For: StaffApplication: Administering your module , QMplusTagged: baseline , groupings , groups
Note: This guide is relevant until mid-August 2022. Guidance relevant to the new QMplus theme will then be available here
The groups feature on QMplus allows you to organise the students on your course. An obvious example is to use groups to organise your students into their seminar or tutorial groups. Once you have groups defined in your course area, there are a variety of ways in which you can make use of them:
- You can make administrative tasks easier, being able to filter assignment submissions by group or being able to send targetted emails to different groups
- You can set up activities to allow groups of students to work together e.g. through group forums, group wiki pages or group assignments
- You can restrict access to content or activities in your course area according to group. Do you only want students in group A to see that file? That is easy to do once you have the students in groups
Groupings are groups of groups, so where you may decide to group your smaller groups of students into one or more larger groups. Groupings can be useful if you have lots of groups in your course or you have different types of groups e.g. seminar groups and project groups and you sometimes need to treat these differently.
This guide covers how to:
View groups and grouping information
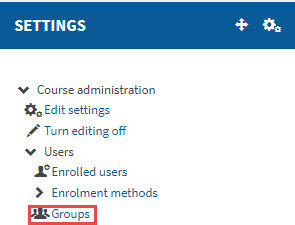
In the Settings block in your course area, select Users and then Groups
On this page you will find information about all the groups and groupings that are already set up in your course area. You can see how many groups there are and how many students are in each group. You can use the tabs at the top of the page to see information about groupings and to set them up. The overview tab provides an easy overview of both groups and groupings in your course area, allowing you to easily see any students who are not a member of groups.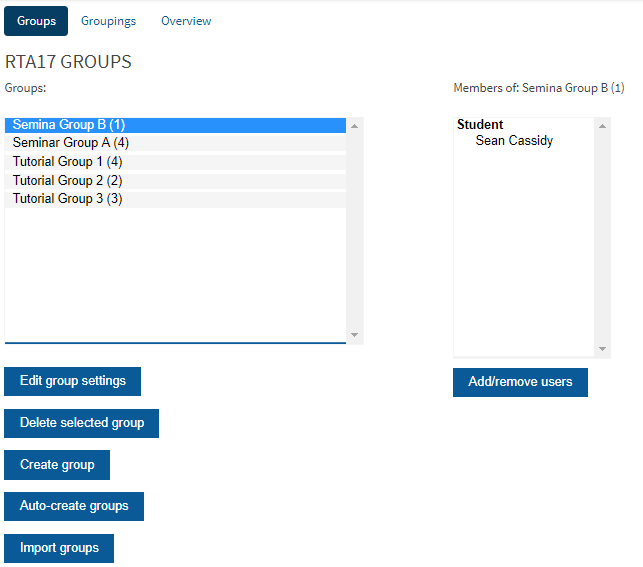
Creating and populating groups
There are a number of ways in which you can set up groups:
- Manually – you can create the groups and then manually allocate students to them by selecting them from the list of enrolled users on your course. This is fine if you have a relatively small number of students enrolled on your course.
- Auto create – You can get QMplus to automatically create groups according to a number of different parameters e.g. you might ask for groups containing a set number of students or you might ask for a set number of groups. QMplus will then create the groups and assign the students for you.
- Let the students choose – you can use the Group choice activity to allow students to choose which group they want to belong to.
- Spreadsheet upload – if you have a very large number of students to allocate to groups the easiest way is likely to be by preparing a spreadsheet and uploading it using the bulk enrolment feature.
- Use self enrolment – you can set up your course area to allow people to enrol themselves. You can then set up different enrolment keys which will put people into different groups in the course area.
Creating an empty group
To create an empty group, click on the Create group button.
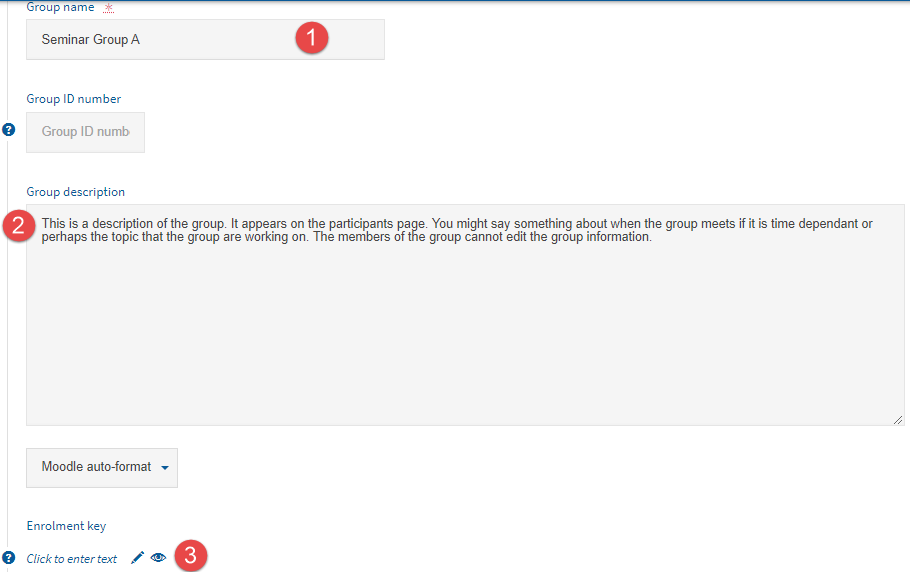
You can now define the following group information:
- Group name
- Group description – the group description appears on the participants page in the course area, if you have allowed access to this page. You can put important information here such as when the group meets, if this is important, or what topic they are working on. Anything you think it is important for the members of the group to know.
- Enrolment key – this field is only important if you are using self-enrolment on your course area. This key will ensure that those enrolling themselves are put into the correct group.
You do not have to enter anything in the group ID field.
Further down this page you will find that you can associate an image with a group. This image appears in a variety of different places, including:
- On the participants page when the group is selected
- On discussion forum posts
- In the sidebar in group blogs
You do not have to use an image for a group and if you don’t, the name of the group will be used.
Manually adding people to groups
As stated previously, there are a number of ways in which you can populate your groups. Here we will cover adding members manually. You will find seperate guides for populating groups in other ways in the next steps section at the end of this guide.
- Select the group you wish to add members to
- Click the Add/remove users button
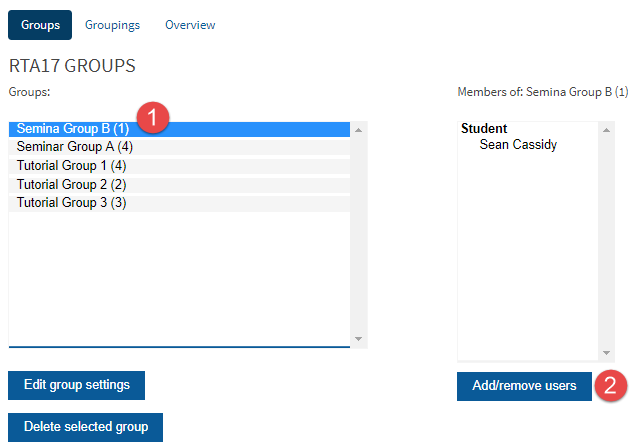
- Select the users you wish to add in the list on the right
- Click on the Add button to add them to the group
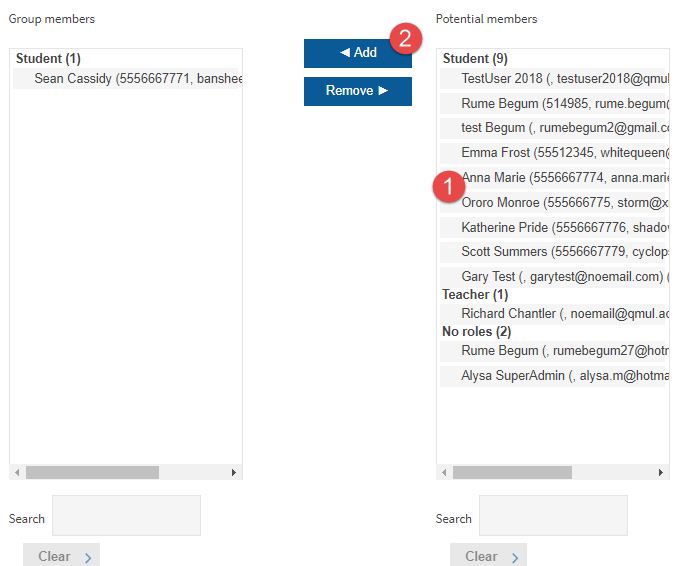
Click on the Return to groups button when you are finished.
Creating and using a grouping
Groupings are groups of groups. They become very useful if you have lots of groups in your course or if you have different types of groups that you need to treat differently. If your use of groups is relatively simple, you may never have to use a grouping.
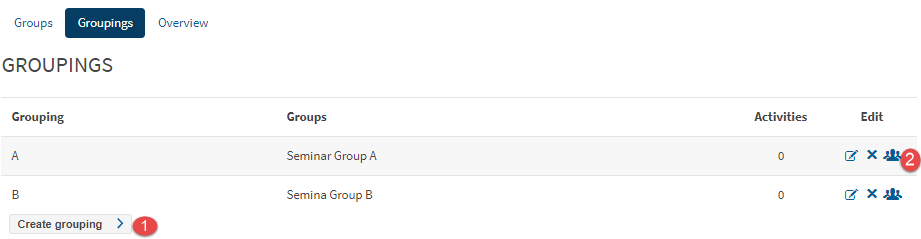
To create groupings, ensure you are on the Grouping tab on the groups page.
- Click Create grouping to create a new grouping. You can supply a name and a description
- Click on the Members icon to select groups to add to your grouping
Using groups and groupings
Once you have your students in groups, you can make use them in a variety of ways.
Restricting access to content and activities
You can restrict access to resources and activities according to the group that a student is in. This is achieved through the Restrict access section in the settings for any resource or activity.
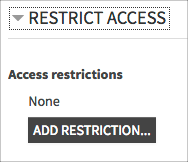 After clicking on Edit settings for a resource or activity, scroll down to find the Restrict access section.
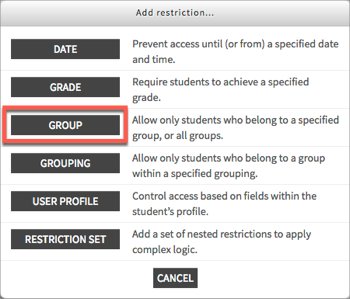
You can restrict access either by group or by grouping. In this case we’ll use a group.
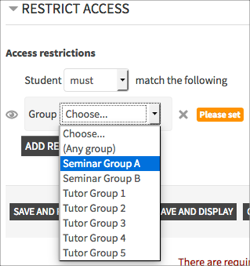
Select the group that you wish to restrict access to from the drop-down menu.
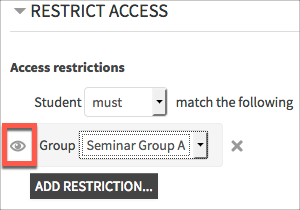
By default, items with restricted access will be shown greyed-out to those who are not members of the selected group. e.g. in this case, students who are not members of seminar group A will see this item greyed-out. If you’d like the item to be completely hidden from those not in the selected group, click on the eye icon to hide it completely.
You can also restrict access to topic sections on your course home page.
Setting up group activities
You can set up activities to be group activities. This is different to restricting access to an activity. What this means depends on the type of activity. For example:
- Forums – You can set up a group discussion forum. Students can have discussions in their groups where only the group can contribute. You as the teacher can see and contribute to all discussions.
- Blogs – You can set up group blogs. A little like group discussion forums.
- Assignments – when you set the group mode on an assignment, it allows you to be able to filter assignment submission by group. This can be very useful if you have a large number of students in your course. It is also possible to set up group assignments.
In this case you need to set the Group mode in the Common module settings of the activity. First click on Edit settings for the activity you are interested in.
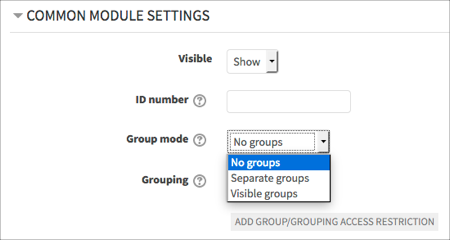
Scroll down to the Common module settings section. Here you can select the group mode that you wish to use.
- Seperate groups – this means that students will work in their own groups and will not be able to see what other groups are doing
- Visible groups – this allows students to work in their own groups but to also be able to see what other groups are doing (although they generally cannot contribute to them).
How this group mode works varies from activity to activity. For instance, setting the group mode to visible groups on an assignment does not mean that the students can see each others assignment submissions.
Some activities do not support group mode at all, e.g. the glossary activity, in which case the option is not available.
Next steps
You may find the following guides useful:
Did this answer your query? If not, you can raise a ticket on the online Helpdesk or email: its-helpdesk@qmul.ac.uk . Alternatively you can also request a particular guide or highlight an error in this guide using our guides request tracker.
Produced by the the Technology Enhanced Learning Team at Queen Mary University of London.
Related items
